Creating an online tutorial is quite easy if you just want text, photos, and voice. PowerPoint with narration can do a fine job but when you want to add diagrams, the task can become a lot more time consuming, especially if you want to show stages of development. You could have someone take a video of you explaining the concepts while you draw on your whiteboard, but the labour required is a deterrent. The Smart Pen provides a very simple alternative.
Smart Pens for Students
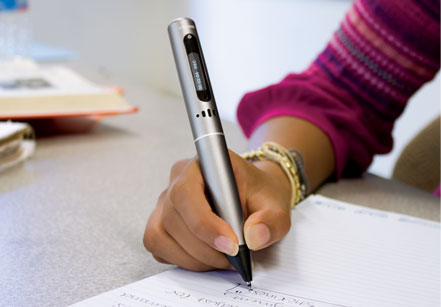
Livescribe introduced Smart Pens a few years ago for students to record notes and lectures. The pen contains a tiny camera that records what is written in a special note book and the microphone records the lecture. The software for playing the recordings is very clever. Students play back the recording on their computer and the voice is synchronised with the appropriate writing or drawing. Students can touch their pen on any part of their notes or diagrams and the audio plays from that part of the recording, so replaying a passage is quick and very simple.
When the pen is docked with the computer, the software transfers to recording to the computer. With a mouse click, the software can upload the new recording to a YouTube style website where they can be shared. Livescribe calls these shared recordings Pencasts. They use Flash format.
To get a better understanding of the procedure, watch the short video clips on this page.
For Teachers Too
The Smart Pen and Livescribe software provides a very simple way for Science teachers to create simple online tutorials and share them with students. You just sit at your desk with the pen and Livescribe notebook, touch the record symbol on the page and start speaking while you draw. When you have finished, touch the stop symbol. Then dock the pen so the tutorial can be transferred to the computer and click the upload button. Within a few minutes from when you stop recording the tutorial can be ready for students. You can provide a link to the tutorial or embed it on a web page such as a blog or a page in your learning management system.
Here is a simple example - nothing starry and it even has a mistake in it, but it provides students with a helpful learning experience. Notice that you can make it full screen with the click of a button and at the bottom left you can control the display mode for your writing and sketching. The default is to have everything grey to begin with and it gets over-written with the green colour as you proceed through the tutorial.
Showing posts with label ICT for teaching science. Show all posts
Tuesday, May 17, 2011
Sunday, May 15, 2011
Beyond PowerPoint
This is the first in a short series on using tech tools for Science classes. None of the ideas are ground-breaking innovations but I did find that they provided significant benefits for learning. While these ideas were used for Science classes, they could be applied to other subject areas.
Outside of the Science lab, I had used PowerPoint for many years, so when I eventually obtained a permanently installed data projector on my room, I decided to use PowerPoint whenever I was presenting new work. When I started doing this, I often became frustrated when students showed that their priority was to copy down every word on the screen rather than participating in the discussion and getting to understand the concepts. In attempt to change their priority I would tell them they could easily download the PowerPoint at home but it is not easy to participate in the discussion at home.
When it came to revision time, I decided to add narration to my PowerPoint documents to give a summary of what we had discussed in class add the comments that I typically did in class. The positive feedback from students encouraged me to do this for each topic. They never commented in the quality of my microphone even though the recordings had background noises.
Benefits
The main benefit I found was that using these narrations in PowerPoint enabled me to shift some activities to out-of-class work, providing more time in class for discussion and individual help. Of course, there are many other ways that you could use PowerPoint with narration. I have had students use this method to prepare assignments as an alternative to written work or oral presentations.
How-To
Recording narration in PowerPoint is quite efficient. If you stumble on words and wish to repeat, you can repeat the recording for individual slides. There are many web videos that provide instructions for recording narration in PowerPoint. Here is one from YouTube.
When you have the recording you can upload it your schools learning management system, but I found that AuthorStream provides a very good alternative, that is totally free. You can link to the Authorstream page or better still, you can embed the presentation on a web page, as shown in the sample below.
This make it look like an image on your web page and gives you the option of writing comments such as instructions or questions. It also helps to keep your students on your page.
If you are not familiar with the procedure for embedding video, here is a YouTube video that explains how to embed a YouTube video into a blog.
Embedding from Authorstream is very similar but the embed button is on the right. The embed text is HTML code and some systems can automatically recognise it as HTML. In other cases, you need to switch to HTML edit mode and paste the code there.
Outside of the Science lab, I had used PowerPoint for many years, so when I eventually obtained a permanently installed data projector on my room, I decided to use PowerPoint whenever I was presenting new work. When I started doing this, I often became frustrated when students showed that their priority was to copy down every word on the screen rather than participating in the discussion and getting to understand the concepts. In attempt to change their priority I would tell them they could easily download the PowerPoint at home but it is not easy to participate in the discussion at home.When it came to revision time, I decided to add narration to my PowerPoint documents to give a summary of what we had discussed in class add the comments that I typically did in class. The positive feedback from students encouraged me to do this for each topic. They never commented in the quality of my microphone even though the recordings had background noises.
Benefits
The main benefit I found was that using these narrations in PowerPoint enabled me to shift some activities to out-of-class work, providing more time in class for discussion and individual help. Of course, there are many other ways that you could use PowerPoint with narration. I have had students use this method to prepare assignments as an alternative to written work or oral presentations.
How-To
Recording narration in PowerPoint is quite efficient. If you stumble on words and wish to repeat, you can repeat the recording for individual slides. There are many web videos that provide instructions for recording narration in PowerPoint. Here is one from YouTube.
When you have the recording you can upload it your schools learning management system, but I found that AuthorStream provides a very good alternative, that is totally free. You can link to the Authorstream page or better still, you can embed the presentation on a web page, as shown in the sample below.
This make it look like an image on your web page and gives you the option of writing comments such as instructions or questions. It also helps to keep your students on your page.
If you are not familiar with the procedure for embedding video, here is a YouTube video that explains how to embed a YouTube video into a blog.
Embedding from Authorstream is very similar but the embed button is on the right. The embed text is HTML code and some systems can automatically recognise it as HTML. In other cases, you need to switch to HTML edit mode and paste the code there.
Subscribe to:
Posts (Atom)
